Webserver & Proxy Configuration
How to install Kimai on your server with git, composer and SSH or FTP
Self-hosting knowledge prerequisites
Self-hosting Kimai requires technical knowledge, including:
- Setting up and configuring servers and containers
- Managing application resources and scaling
- Securing servers and applications
- Configuring Kimai
Kimai recommends self-hosting for expert users. Mistakes can lead to data loss, security issues, and downtime. If you aren’t experienced at managing servers, Kimai recommends the hosted cloud.
If you can’t manage to get Kimai up and running, it is very likely not an issue with Kimai.
- Check your server logs first and the Kimai logs (at
var/logs/inside the Kimai directory). - Try to find an answer at Stackoverflow, ServerFault or other online communities
The following configurations are meant to give you a first idea how your config could look like, they either might be incompatible with your exact setup or might need further tweaking to work.
I don’t offer free support for such situations, but you can contact me about paid installation support.
Subdirectory usage
Kimai was made to be hosted on the domain level, so running it inside a subdirectory is not supported.
Nginx
This is only an example, that needs to be adapted to your needs (eg. path and PHP-FPM version).
server {
    listen 80 default_server;
    listen [::]:80 default_server;
    server_name kimai.local www.kimai.local;
    root /var/www/kimai/public;
    index index.php;

    access_log off;
    log_not_found off;

    location ~ /\.ht {
        deny all;
    }

    location / {
        try_files $uri /index.php$is_args$args;
    }

    location ~ ^/index\.php(/|$) {
        fastcgi_pass unix:/run/php/php8.1-fpm.sock;
        fastcgi_split_path_info ^(.+\.php)(/.*)$;
        include fastcgi_params;
        # You can use the document root directly:
        # fastcgi_param SCRIPT_FILENAME $document_root$fastcgi_script_name;

        # But this is not working in every situation. When you are using symlinks to link the document
        # root to the current version of your application, you should pass the real
        # application path instead of the path to the symlink to PHP FPM.
        # Otherwise, PHP's OPcache may not properly detect changes to your PHP files
        # (see https://github.com/zendtech/ZendOptimizerPlus/issues/126 for more information).
        fastcgi_param SCRIPT_FILENAME $realpath_root$fastcgi_script_name;
        fastcgi_param DOCUMENT_ROOT $realpath_root;
        # Activate this if you run Kimai alone or inside a VirtualHost, otherwise this example might break other PHP apps
        # fastcgi_param PHP_ADMIN_VALUE "open_basedir=$document_root/..:/tmp/";
        internal;
    }

    location ~ \.php$ {
        return 404;
    }
}
Read the Ubuntu setup guide to find out more.
Apache
How you have to setup Apache is different across different server distributions, make sure to adapt the techniques, paths and commands according to your OS.
Kimai .htaccess
Kimai ships a default .htaccess,
which needs to be allowed by Apache via AllowOverride All.
Create VirtualHost
<VirtualHost *:80>
    ServerName kimai.local
    ServerAlias www.kimai.local

    DocumentRoot /var/www/kimai/public
    <Directory /var/www/kimai/public>
        AllowOverride All

        # If you see an error like the following in your logs:
        # AH01630: client denied by server configuration: /var/www/kimai/public/
        # then you might have to exchange the "Order/Allow" rules with "Require" (see below)
        # More infos at https://httpd.apache.org/docs/2.4/de/upgrading.html

        # Apache 2.2
        Order Allow,Deny
        Allow from All

        # Apache 2.4
        # Require all granted

        FallbackResource /index.php
    </Directory>

    <Directory /var/www/kimai>
        Options FollowSymlinks
    </Directory>

    # optionally disable the fallback resource for the asset directories
    # which will allow Apache to return a 404 error when files are
    # not found instead of passing the request to Symfony
    <Directory /var/www/kimai/public/bundles>
        FallbackResource disabled
    </Directory>

    ErrorLog /var/log/kimai_error.log
    CustomLog /var/log/kimai_access.log combined

    # optionally set the value of the environment variables used in the application
    #SetEnv APP_ENV prod
    #SetEnv APP_SECRET <app-secret-id>
    #SetEnv DATABASE_URL "mysql://db_user:db_pass@host:3306/db_name?charset=utf8mb4&serverVersion=8.3.0"
</VirtualHost>
Make sure to activate the correct block for your Apache version, find out with e.g. ‘apachectl -v’
Activate required modules PHP & Rewrite
This step should not be necessary. If you don’t have a running PHP module yet, find out how to install and activate it for your server distribution. If you have the module installed but its not yet working, it might be necessary to activate it first in Apache.
This is often done with either linking a config using a tool like a2enmod or by manually linking the
php8.conf to the proper directory. If that doesn’t help, you can try it with something like this:
LoadModule php8_module libexec/apache2/libphp8.so

<IfModule php8_module>
    AddType application/x-httpd-php .php
    AddType application/x-httpd-php-source .phps
    <IfModule dir_module>
        DirectoryIndex index.php
    </IfModule>
</IfModule>
Change the .so module directory to environment.
The same goes for the mod_rewrite module, which is required for Kimai to work:
LoadModule rewrite_module libexec/apache2/mod_rewrite.so
IIS on Windows or Azure
This is not officially supported, basically because I have no way to test it. But if you want to join the discussion, please visit the issue tracker here and here and also check the Symfony documentation page which might help.
The following information was provided by a Kimai user:
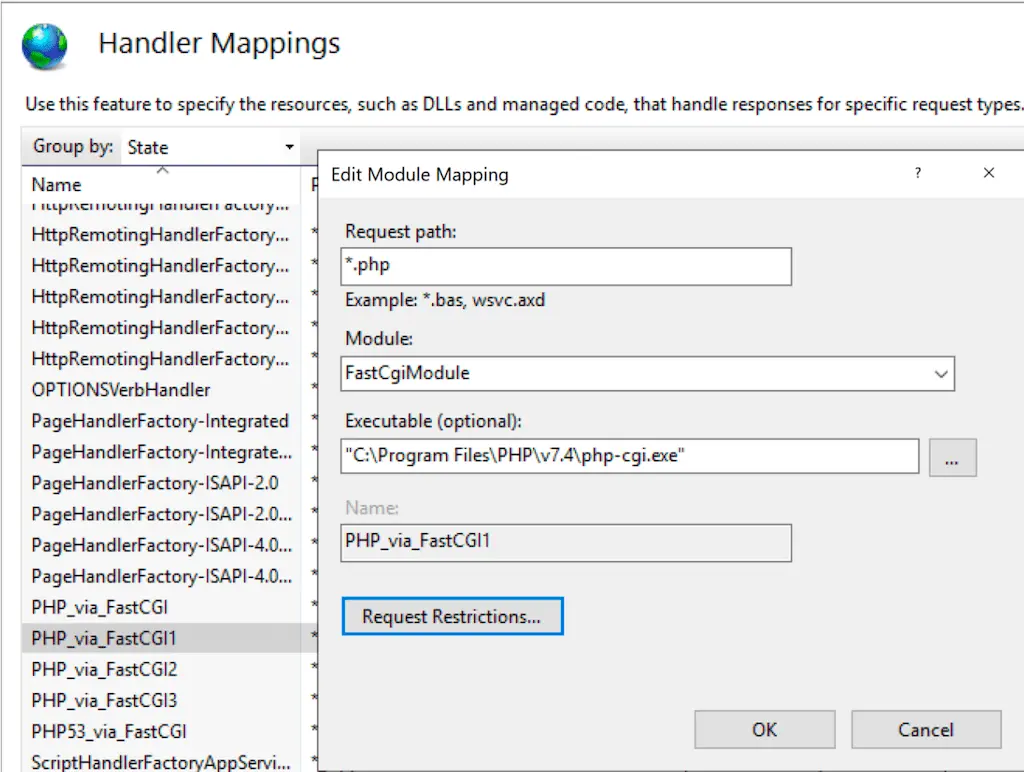
When executing the commands from the official installation docs you might have to prefix
them with the absolute path to your PHP executable, e.g. C:\Program Files\PHP\v7.4\php.exe bin/console kimai:install -n.
The webserver needs file permissions as documented.
Remember to prefix the console command when creating your first user with
C:\Program Files\PHP\v7.4\php.exe bin/console kimai:user:create username admin@example.com ROLE_SUPER_ADMIN.
Webserver configuration
Create a standard website in IIS with document root set to your Kimai directory, e.g. C:\htdocs\kimai\public.
Make sure memory_limit is set to a minimum of 256M.
Set appropriate handler mappings as below:

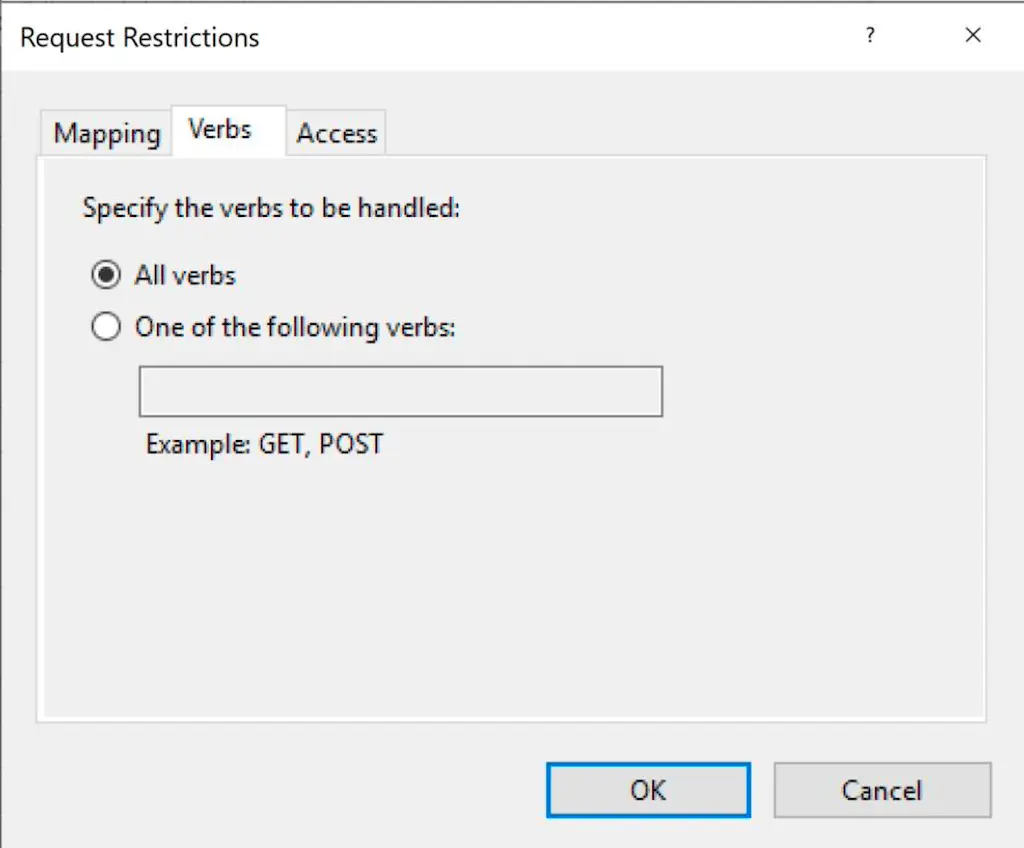
Under Request restrictions you have to select the Verbs tab.
Here you can select All verbs or the following using the option “One of the following verbs:”
HEAD,POST,GET,PUT,PATCH,DELETE

This is important, as the API requires those methods: you would not be able to use Kimai properly, e.g. stop timesheets.
Reverse proxy
When you want to run Kimai behind a proxy, you have to provide all necessary X-Forwarded-* headers.
Nginx Proxy Manager
Here is a very short example for the Nginx Proxy Manager.
location / {
    proxy_pass http://192.168.0.170:8001; # ← replace with actual internal IP:port of Kimai app
    proxy_set_header Host $host;
    proxy_set_header X-Real-IP $remote_addr;
    proxy_set_header X-Forwarded-For $proxy_add_x_forwarded_for;
    proxy_set_header X-Forwarded-Proto $scheme;
    proxy_set_header X-Forwarded-Host $host;
    proxy_set_header X-Forwarded-Port 30022;
}
This is a larger example of a nginx proxy configuration, which terminates SSL on kimai2.local and forwards the request
to Kimai running at http://127.0.0.1:8010/:
server {
    listen 443 ssl;
    server_name                 kimai2.local;
    ssl_certificate             /etc/ssl/certs/kimai2.local.crt;
    ssl_certificate_key         /etc/ssl/certs/kimai2.local.key;
    ssl_session_timeout         5m;
    ssl_protocols               SSLv2 SSLv3 TLSv1;
    ssl_ciphers                 HIGH:!aNULL:!MD5;
    ssl_prefer_server_ciphers   on;

    location / {
        proxy_pass http://127.0.0.1:8010/;

        proxy_set_header  Host $http_host;
        proxy_set_header  X-Real-IP $remote_addr;
        proxy_set_header  X-Forwarded-Host $host:$server_port;
        proxy_set_header  X-Forwarded-Server $host;
        proxy_set_header  X-Forwarded-For $proxy_add_x_forwarded_for;
        proxy_set_header  X-Forwarded-Proto $scheme;
        proxy_set_header  X-Forwarded-Port $server_port;
    }
    # Redirect HTTP to HTTPS, in case an invalid (plain HTTP) request was sent to port 443
    error_page 497 https://$host:$server_port$request_uri;
}
Now, when you open https://kimai2.local/ you wil be redirected to the login URL without http, here: http://kimai2.local/en/login/.
Why is that? Well, because you have to tell Kimai (or the Symfony framework) that it should trust your proxy and take the headers into account
when generating URLs for links and redirects.
To achieve that, set the environment variable TRUSTED_PROXIES to the name of your proxy, either via .env file:
TRUSTED_PROXIES=127.0.0.1,kimai2.local,localhost
or set it in your Kimai server definition (here nginx syntax):
fastcgi_param TRUSTED_PROXIES "127.0.0.1,kimai2.local,localhost";
Links
- The Symfony site is covering multiple webserver and environments setups.
- There is a full installation guide on how to setup Kimai on Ubuntu 18.04